Monday, 10 June 2013


 SlouchpotatoeAo7


I have starting to knit again the reason for this is that I need to keep my finger plyable or they will just stiffen up with the arthrits. I have knitted a number of scarfs for my daughters but unfortunately I did not take a pictures of them so I cant show them to you but I do have a picture of Mary and baby Jesus I will be knitting Joseph next.
I have never knitted things like this before and I found it very fiddely .

This is a Scottish Fairilse berret and this is the type of things I like to knit

lse Berret It was knitted with shetland wool which I bought on one of my overseas visits.

This is the side view


I am going to knit another one for my daughter Melissa

 Elizabeth has already got hers


Sunday, 9 June 2013

 For this challenge . 
I have remade the back of my 1533 gown which is far too small for me it was not an easy job but it fits squares and triangles challenge.  I have made the back 2" longer and 4" wider  it looks very nice and I am looking forward to wearing it again.
 This is the front of the Gown it is fully boned
I tried to show you the sleeve but it did not come out very good  it does not show the slashed sleeves
Another view of the sleeve with the trim going down the full length of the sleeve
  This is the back and as you can see it is not finished and I have to add more trim
This is one view of the inside of the back with all the new work showing
 The other side showing the hand work done


The Challenge 11 Squares, Rectangles & Triangles
 
Fabric:Rayon Velvet

Pattern: Pianting

Year:1533

Notions:Cane

How historically accurate is it? 100% mostly hand sewn

Hours to complete: 45 hours

First worn: 15th May

Total cost Zero. 

Tuesday, 14 May 2013

Literature

As I dont read much I have decided to make a late 18th century Fishu - Handkerchief  which I hope to wear with the 1790's Caraco dress (the petticoat and shoes I have already made) and as I dont have the corset made yet so I cannot make the Caraco jacket it should get made soon I hope.   The only thing left to me was the Fishu


I am really sorry about having to put a seam down the middle of the back but I had no choice as 
I did not have that much material.


The Challenge 10 -Literature
 
Fabric: solid stripped gauze

Pattern: none

Year: 1790

Notions: Cotton thread

How historically accurate is it? I don't know but I will be hand sewn

Hours to complete: 8 hours

First worn: for the picture but will be worn in June

Total cost material from my stash.

Sunday, 14 April 2013

Flora and Fauna


Challenge 9

Flora and Fauna

1873 Hat 


I already had the materials including a small black straw with the back turned up.  I had bought it to make an 1873 hat around 2006  so this hat cost me nothing as all the decorations were out of my stack..


The Challenge:9

Fabric: Straw, feathers art flowers piece of lace

Pattern: one
Year: 1825

Notions:

How historically accurate is it? copy of an original with the use of different colours etc

Hours to complete: 4 hours

First worn: ever will be worn when I go to an event which calls for the 1873 dress I have finished on the fortnightly sewing.

Total co; Nil

As I had finished the 1873 hat for the Challenge early I was trying to think of what else I could do.
Then I remembered that  after an event   I had to loan an 1835's bonnet from a friend as my own one was far to large and wide on the brim I just did not like it and thought that I should take it down to the frame and re-do it, shouldn't take me long I told myself 11 hours later all was finished except the ties which I did this morning another hour soon passed  and thank goodness it is now finished and I will be able to wear it  at another event this weekend.


I
The Challenge:9

Fabric: Cotton, Buckrum
Pattern:
Year: 1835

Notions: Feathers and Trim

How historically accurate is it?  I do not think it is inaccurate as the pattern I used when I first made it said it was period correct.

Hours to complete: 11 hours

First worn: The 'NEW' bonnet will be worn this weekend

Total co; Nil


Thursday, 4 April 2013

Accessorise Challenge 7

I have decided to make an old pair of Laura Ashely's 1980's shoes into 1780-90 inspired from the American Duchess. I am not a very good photographer as you can't see the shape of the heel they are a bit like the Louis heel which was very popular in the 1980' so I think that they will be okay.

Shoes with the first coat dye on which is supposed to be Navy probably will get darker as more coats are applied.

1980's Shoes

1790 shoes


 1980 shoes  after the second coat of dye


 It seems to me that the instep part opf the 1790 shoe is higher so this is my idea of how to do this.  I found a bit of strong cardboard put it inside the shoes tried them on to see if they were still comfortable and they were fine.  I now will paint the cardboard then glue them in place cover the top end with petersham.


 They look a bit odd at the moment but I am sure once the petersham is on and they are glued into place they will be fine. they need another coat of dye then the pertersham on the top and glue into to the shoes clip on the buckles and I believe they will book not bad.


Well thats them glued unfortunately I have some glue on the surface I will have to get some nail polish remover and gently try and clean them up. I wonder if they would look better if I use the last of the dye and cover up the pettersham.
I will have to dye the petersham as it not so good I may have to put a slit in the cardboard and put the buckles lower on the front.


1980's made to look like 1790's


When I started the fortnightly historical sewing I made the decision that I would only use items and materials that I had already in the house and up to date all that I have had to buy was  tape for the waist of the 1790 skirt and petticoat.

Since starting this venture into the 18th century I have found it very interesting but as I have only made Regency to Edwardian before it means I do not have the underpinnings for that era, the result of this is that  I have to do things before I even start the challenge eg., I cannot make the Caraco Jacket until there is a corset made. I am looking forward to making this as it will be a change to flatten my front as opposed to a curvy silhouette.


Saturday, 23 March 2013

1780 Caraco dress


I have decided to skip the 1820 work dress for the moment.

I will be doing the stripe challenge and my chosen garment is a Norwegian  'Caraco Dress' this is a very popular style during the later part of the 18th century as working people could wear it.


I have now sewn most of the skirt unfortunately I have to make a bum pad and an underpetticoat before I can attach the Ruffle to get the correct legnth this puts me back so I cannot post it yet.

The bustle is finished and the underpetticoat has only to be hemmed  and the ruffle is pinned on so I hope to have it all sewn by this evening after I have pressed it I will post it.
I unable to make the jacket as I have to make a 18th century corset first.

This venture into the 18th century has given me the desire to make another one perhaps with small panniers, but not until I have finished my 1820's peasant dress.
I used a number of pictures the main one which gave me some idea of the shape and the petticoats was

Late 18th Century Skirt Supports: Bums, Rumps, & Culs. By Kendra Van Cleav


 I could not find an original 18th century bustle I just had to make one up which would give me the desired shape. I was not keen on the ones giving as examples on the abopve site the last one  I felt was too much like a Victorian bustle
 The under petticoat I made is very similar to the skirt itself the only difference is the pleats back and front are the same. I just had to guess at this as I could not find an original to copy. .
 As you can see my bustle gave me the shape I wanted nice and rounded with just a little bit on the sides.

The front of the skirt  which has flat pleating with a box pleat in the centre
The skirt was three lengths at 112cm  and the ruffle five widths of the 112cm by 40cm.
I was a bit short on materials so I had to make the pleats a bit larger than I would have done narmally but I felt that the as original was probably silk and mine would be a cotton of sorts it would do for my first venture into the 18th Century. 

  Close up of the front pleating
Close up of the back pleating.


The Challenge: 6

Fabric: Cotton/synthetic

Pattern: none

Year: 1780-90

Notions: Cotton Tape

How historically accurate is it? Copy of an original but machine sewn

Hours to complete: 15

First worn: only when being fitted

Total co; Unknown material from my stash


Friday, 15 March 2013

Challenge 5 Work dress

his is the bodice before attaching it to the skirt. The seams are all piped  and the bodice is lined I always put the sleeves in at this time than for no other reason than to beable to say "thats the bodice finished.
 

This is my Chalenge 5 - Work dress 

'The Mantua Maker 1825-1830 Day dress'

 I know I am late in starting it but better late than never. The  pattern I am using is from 'The Mantua Maker 1825-1830 Day dress'.
I have the tiole of the bodice finished and fitting all done.
 It will be made it in white cotton lining with gray cotton that has a tiny little flower with a bit of charcoal and yellow coloured pattern around it.
Well I have not got as much done as I would have liked  I hope that I will get the main fabric cut tomorrow  I think I may be struggling to get it all out of the material the patterns says 7 and a half and I think I only have 6 mts I may have to put a contrasting colour on the bottom. 
I stopped doing this gown as I felt I had to try and catch up and then perhaps get back to it.
Today 4th April I finally got back to the dress  I have now got the back and front done I will be putting in the sleeves tomorrow (I hope) and strt to get the skirt attached. No luck I read the instructions and I have to have the bodice done then put the belt on then on goes the skirt.  The piping and the sleeves are all done and it is all beginning to look good.
I have sewn the skirt and  I was right I did not have enough material but as I was doing a working class dress so I thought that folks would not have all that much money so they would have had three drops instead of four.  I cut the sleeves out which were masive and found that I would have to patch a peice of the material into the third length.  I know this is period correct as I have seen originals that have had pieces put in when material was short and they were middle class so how much more would the working people have done.  I did not think it was going to be so hard to get the dress out of the material I had but It is made and thank goodnes.  I have never had to make bias for the piping out of such small pieces some pieces were as small as 4 inches long but it is all finished and all I have left is a piece approximately 2x3inches.
t

I have opened the front so it can be seen how I lined but mostly to show the construction of it.

 The finished item puffs in sleeves you will just have to imagine what it would look like once my arm is in as well  they will be a bit larger.
 close up of the bodice and waist band which is a little lowere that gowns were in 1810's
 Side view
 Full view
The Challenge: 5

Fabric: Cotton

Pattern: Mantua maker 1825 dress

Year: 1825

Notions: piping cord, brass pins

How historically accurate is it? Machine sewn so I would say it is 90%

Hours to complete: This is a bit hard to say as I stoped and re started the dress a guess would be 40 hours

First worn: only when being fitted

Total co; Material bought on special about one year ago for $5 a Mtr I had six mtrs so $30.


I


Wednesday, 13 March 2013

1873 Challenge 4 Embelishment

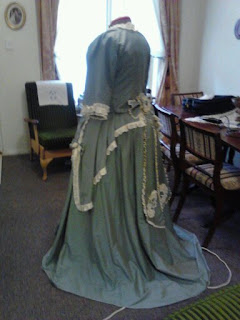
  Please excuse my dummy  I had to make it  bigger and as you can see it is not quite right but it had to do or I would never get the costume finished.
I know I am late in getting it on my blog but I have been ill for almost three weeks the result of that is I will be three weeks late with every thing.


 Challenge 4 Embelishment

Trim the costume started in 2008  
I did not have a pattern for the bodice so I searched my library and the web to get some ideas of how I could trim it using only what I had in the house. I dont think there will be another costume like this but I did my best with what I had.
There are three parts to the costume 

Bodice, Apron and Skirt
The  lace I had was quite old (I dont know how old) it was the only one that I had plenty of and you need a lot for the 1870's .The lace was a tan colour  which was no good for my costume so I decided to bleach it and see what colour it came out, to my relief it did not fall to pieces and it came out a nice creamy colour
which went very nice with the shot green.

Although I was running late I decided I would still hand sew the trim  as I dont think the sewing machine does as nice a job

I tried various ways to trim which took some time as I sewed then unpicked about three times and finally ended up with using the lace double sewn together around the neck and sleeves then added braid to hide the seam in the centre where it was joined.  

On the apron I used the trim single and put braid  on the top side to hide my stitching
I decided to make a few bows and rosettes as both were popular in the 1870's 

The skirt only has the hem tape and a six inch facing this has still to be done but as I wanted to start the next challege I decided to finish it another time.

 As I had no pattern for the bodice I researched my library and the web to get some ideas on what to do

The bodice has nine hooks and nine thread loops

The eight buttons are hand made  I do not know what you would call them except they are material circles which get a gathering stitch round to form a bowl and then stuff the edges into the bowl draw up the gathers and stitch the gap which then if you wish you can make a stem to either put through an eyelet or as I had done use them for decoration only.

The vertical trim down the bodice is there to hide the piece I had to put in as I had grown a bit since 2008.

The back of the bodice has a large bow with tails and a Rosette on the centre of the bow and the tips of the tails and the waist strap is in place.
 

 The Apron has single trim with braid on one edge I made the bows and attached them on the side


 The back with the Rosette's, I cant help feeling that they could be mistaken for the wings of a butterfly.  I started making the rosette's with a gathered piece of the main material then added two rows of the lace then the braid went on to make a nice neat edge. The buttons are trimmed with a bit of tatting I had.and the edges of the tails are trimmed with some antique lace


The rosette on the bow is slightly different as I run out of the lace but I think it still looks okay

The Challenge: 4 Embelishment

Fabric: Silk and Cotton

Pattern:  none


Year: 1873

Notions: Lace,  and very old trim

How historically accurate is it? 90%

Hours to complete: hand sewing of trim 12 hours

First worn: never
 
Total co: unknown as I had all in the house bought many years ago